Christmas Village Display Table: Folding Table Setup Guide
Every year the Christmas village comes out of its boxes, and every year the same question comes up: where do you put it? A bookshelf is too shallow, the dining table is needed for meals, and the mantel only fits a few pieces. A Christmas village display table solves that. A sturdy folding table gives you a flat, dedicated surface that you can set up in the right corner for the season and fold away in January.
This guide walks through choosing the right size of folding table for your village, building risers and scenery on top of it, handling lights and cords safely, and packing the table away when the holidays are over.

Why a Folding Table Makes a Good Christmas Village Display Table
Village collectors tend to build their displays on whatever furniture is free, and that usually means compromises. A folding table works better for a few practical reasons:
- It is a dedicated surface. The display can stay up all season without taking over a table you need for dinner or homework.
- It handles the weight. Ceramic and porcelain buildings add up quickly once you include risers, lighted accessories and a power strip. Our plastic folding table has a high density plastic top on a metal frame that the product page rates to support up to 300 lbs.
- It cleans up easily. Fake snow, glitter and craft glue wipe off a smooth plastic top with a damp cloth.
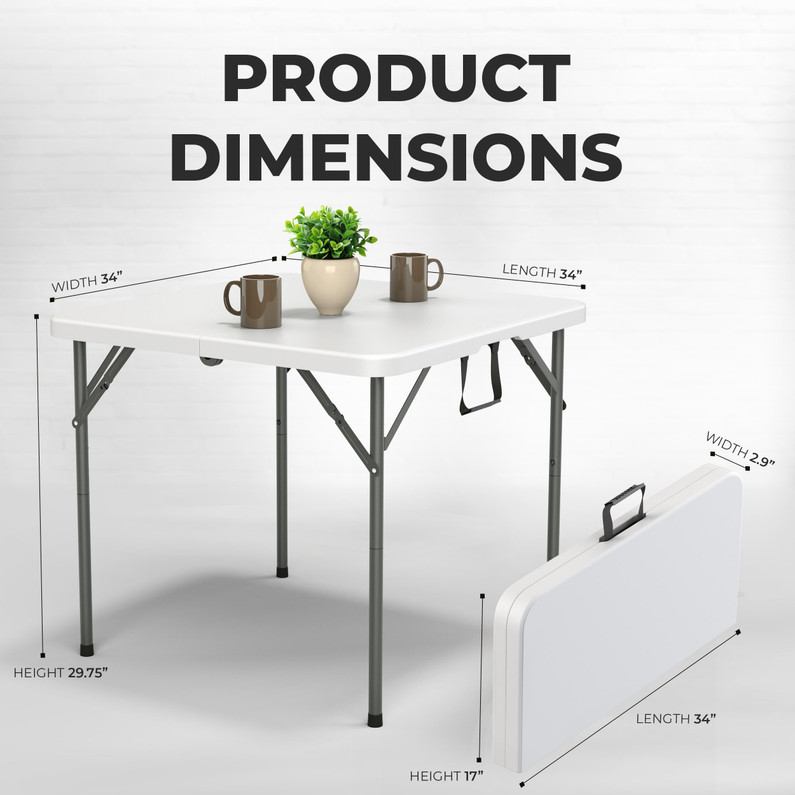
- It stores flat. The tabletop folds in half and has a built in carry handle, so it can go into a closet or garage with the village boxes after the season.
Choosing the Right Table Size for Your Village
The best size depends on how many buildings you own and where the display will stand. Our plastic folding table is offered in several sizes and shapes, including 3 FT, 4 FT, 6 FT and 8 FT rectangular tables, a 3.5 FT round table, and a 5.5 FT adjustable height version, in black or white. Check the product page for the current options before ordering.
Small collections and tight corners
If you have a handful of buildings, a 3 FT or 4 FT table fits against a wall or in a corner without blocking a walkway. A round table works well in the middle of an entryway or bay window where people can walk around it and see the village from every side.
Medium collections
A 6 FT table is a comfortable middle ground. It leaves room for a main street, a few side streets and a backdrop row of taller buildings on risers.
Large collections and train layouts
If you run a small train around the village, an 8 FT table gives the track more room for gentle curves. Some collectors also place two tables side by side to make an L shape or a deeper display. Line the edges up carefully and cover the seam with batting or a snow blanket.
Think about height
Standard table height puts the village below eye level for most adults, which is perfect for looking down into the streets. If you want children to enjoy it up close, or you want the scene closer to eye level from a sofa, the adjustable height version gives you more flexibility.
Step by Step: Building Your Christmas Village Display
- Pick the spot first. Choose a location near an outlet, away from heating vents and fireplaces, and out of the main traffic path so no one bumps the table.
- Set up and lock the table. Unfold the table, lock the legs fully and make sure it sits level. Place it on a flat floor rather than a thick rug if possible. Check that it does not rock before you load anything onto it.
- Cover the top. A white tablecloth, felt or snow blanket gives you a base layer and hides the table edges. Let it drape to the floor in front to hide cords and storage boxes underneath.
- Build risers along the back. Use sturdy boxes, books or foam blocks under the snow blanket to create hills. Put the tallest buildings in the back row and the smallest in front so every piece is visible.
- Plan your streets. Lay out the main road first, then add side streets, a skating pond or a town square. Leave space between buildings for accessories and figures.
- Run the wiring before decorating. Feed light cords down through gaps behind the buildings to a power strip under the table. Label the plugs with masking tape so you know which building is which.
- Add the details last. Trees, figures, lamp posts and fake snow go in once the buildings and wiring are set, so you are not knocking them over while you work.
Lighting and Cord Safety Tips
Most villages are lit, so the table becomes the base for a lot of small cords. A few habits keep things safer and neater:
- Use a power strip with a switch so you can turn the whole village on and off at once.
- Do not overload the strip or chain several strips together. Follow the ratings printed on your strip and your village adapters.
- Keep cords off walkways. Tape or clip them along the back table leg and down to the outlet.
- Turn the lights off when you leave the house or go to bed.
- Keep the display away from candles, space heaters and open flames, and keep fake snow and cotton batting away from hot bulbs.

Keeping the Display Safe From Pets and Kids
A village at table height is tempting for curious hands and paws. Push the most fragile pieces toward the back, put sturdier buildings and figures in front, and avoid letting the tablecloth hang where a pet can pull it. If you have a cat that likes to jump, a round table in the middle of a room is harder to defend than a rectangular table pushed against a wall. Never let children climb or lean on the table, and keep the total load within the rating listed on the product page.
Taking Down and Storing the Table After the Holidays
When the season ends, pack the buildings first, then accessories and wiring, and only then fold the table. Wipe the tabletop with a damp cloth to remove glue, snow flakes and dust, and let it dry before folding. Store the folded table upright or flat in a dry place, ideally with the village storage boxes so everything is ready to go next year.
Frequently Asked Questions
What size table do I need for a Christmas village?
For a small collection, a 3 FT or 4 FT folding table is usually enough. Medium collections fit well on a 6 FT table, and large collections or villages with a train often need an 8 FT table or two tables combined. Lay your buildings out on the floor first to measure the footprint you need.
Can a plastic folding table hold heavy ceramic village pieces?
Yes, within its rated capacity. Our plastic folding table product page lists a metal frame that supports up to 300 lbs. Spread the weight across the top rather than stacking heavy pieces in one spot, and make sure the legs are fully locked.
How do I hide the table under the village?
Cover the top with a snow blanket or white felt, use a floor length tablecloth in front, and build hills from boxes under the blanket. The table disappears and the storage space underneath becomes a hiding place for cords and empty boxes.
Can I use the same table after the holidays?
Absolutely. Once the village is packed away, the same folding table works for parties, game nights, crafts or extra dining space, and it folds in half for storage when you do not need it.
Set Up Your Village Table This Season
A dedicated display table makes your Christmas village easier to build, safer to light and simpler to pack away. Browse our plastic folding table in multiple sizes, the 6 feet plastic folding table, or see all of our folding tables to find the right fit for your display.
Recent Posts
-
Folding Tables Versus Workbenches for Real Work
A garage project can change quickly: one day you are assembling shelves, and the next you need the f …Nov 15, 2026 -
Aluminum Versus Steel Ladders for Work and Home
A ladder that is awkward to carry often gets left in the garage. A ladder that is too light-duty for …Nov 14, 2026 -
Office Supply Cart Guide for Smarter Workspaces
A supply closet may hold plenty of inventory, but it does not help much when envelopes, labels, pape …Nov 13, 2026