
How to Organize Garage Tools for Easy Access
A garage becomes hard to use when every repair starts with a search for the right socket, extension cord, or drill bit. Learning how to organize garage tools is less about buying a matching set of storage products and more about giving each item a sensible home based on how often and where you use it. The right setup makes small jobs faster, protects equipment from damage, and leaves room to park, move boxes, or handle larger projects.
Start with the tools you already own, then build storage around your actual work habits. A homeowner who changes air filters and handles minor repairs needs a different layout than a contractor loading equipment every morning. The goal is simple: frequently used tools should be visible and within reach, while bulky, seasonal, and backup supplies should stay contained but accessible.
Start by Clearing and Sorting the Garage
Do not try to organize around clutter. Pull tools, hardware, cords, and project supplies out of cabinets, off the floor, and away from work surfaces. You do not need to empty the entire garage in one day if it is heavily packed. Work one wall, shelf, or corner at a time so the project stays manageable.
As you sort, separate items into practical groups: hand tools, power tools, lawn and garden equipment, painting supplies, automotive items, fasteners, cleaning products, and materials for current projects. Set aside broken tools, duplicate low-value items, and parts that cannot be identified. Keeping everything "just in case" is one of the fastest ways to fill a garage again.
Pay attention to items that do not belong in the garage. Household donations, old packaging, and unrelated storage boxes take up room that should support the space's main functions. Once the unnecessary items are removed, measure the clear wall space, ceiling height, shelving areas, and floor space available for carts or larger equipment.
How to Organize Garage Tools by Work Zone
Organizing by category helps, but organizing by task is often better. A hammer, tape measure, screwdrivers, drill, and assorted fasteners are commonly used together for household repairs. Keeping them in separate areas because they are technically different types of tools adds unnecessary trips across the garage.
Create zones based on the work you do. A repair zone might include a workbench, hand-tool storage, a small hardware organizer, and a nearby outlet for charging batteries. An automotive zone can hold fluids, funnels, tire accessories, and tools used for basic vehicle upkeep. Garden equipment belongs close to the garage door used for yard access, not behind household storage bins.
Give each zone a boundary. This may be a section of wall, one shelving unit, a cabinet, or a rolling utility cart. Clear boundaries prevent a workbench from becoming the default landing place for every object in the garage.
Keep daily-use tools at arm level
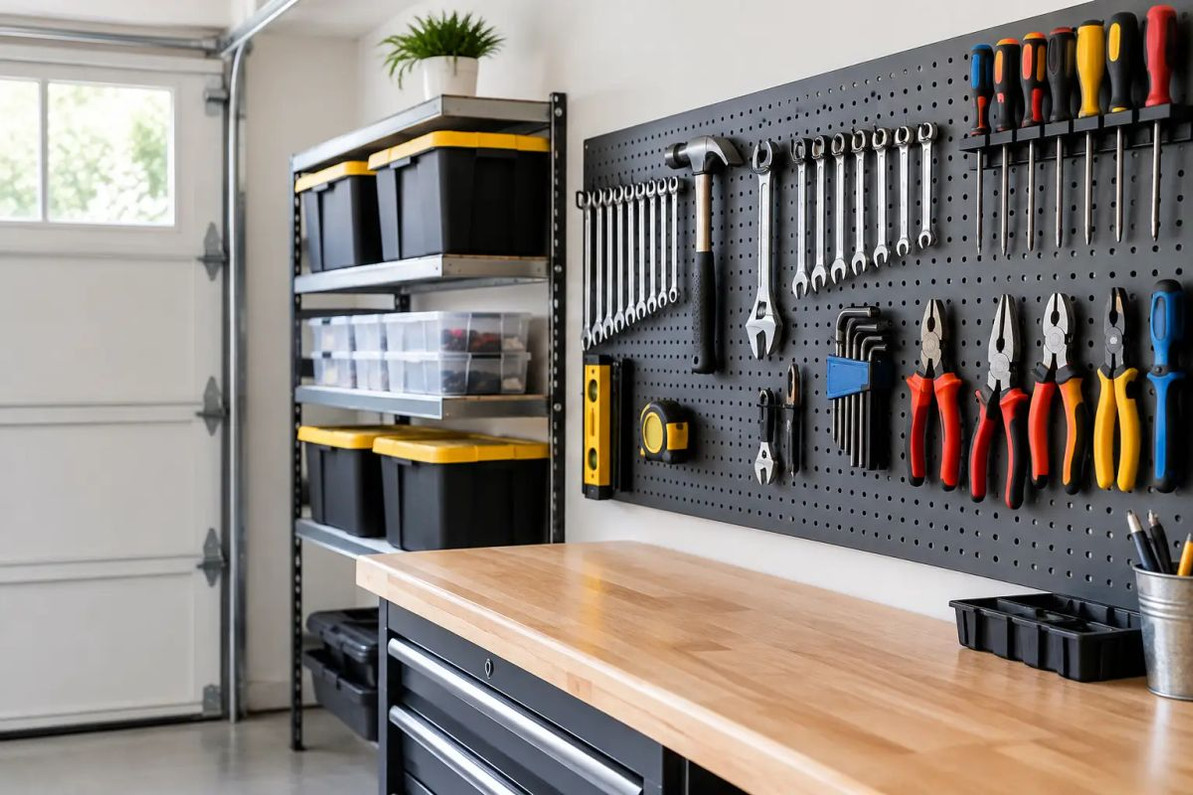
The most-used tools should be between waist and shoulder height whenever possible. This is the best location for screwdrivers, pliers, hammers, measuring tools, cordless drills, and commonly used sockets. A pegboard, slatwall, wall rail, or shallow cabinet can keep these items visible without taking up valuable bench space.
Wall-mounted storage works especially well for tools with handles because you can see what is missing immediately. Outline labels can be useful in a shared garage or maintenance area, but simple category labels are often enough for most homes.
Store heavy and bulky items low
Put heavy toolboxes, power-tool cases, shop vac accessories, jacks, and containers of hardware on lower shelves. This reduces lifting strain and makes items safer to retrieve. Choose shelving that can handle the combined weight of the items you plan to place on it, not just a single box or tool case.
Large tools and equipment should not live loose on the floor if they can be stored on a rack, low shelf, or cart. A platform cart or utility cart can be a practical option for heavier supplies that must move between the garage, driveway, workshop, or storage area. Locking wheels are useful when the cart will also serve as a mobile work station.
Reserve high storage for occasional items
Upper shelves are a good place for seasonal supplies, spare parts, empty cases, and tools used only a few times a year. Avoid storing items overhead if you need them often or if they are difficult to lift safely. Keep labels facing outward, and use containers with secure lids for small pieces and dusty environments.
Choose Storage That Matches the Tool
No single organizer works for every garage. Open wall storage provides quick access, while drawers and cabinets offer better protection from dust and visual clutter. The best choice depends on the tool's size, weight, value, and frequency of use.
Small hardware needs divided storage. Use compartment organizers for screws, anchors, nails, washers, picture-hanging hardware, and drill bits. Clear bins make contents easy to identify, but opaque bins work well when they are labeled consistently. Avoid tossing mixed hardware into one large container. It saves a few minutes during cleanup and wastes far more time during the next repair.
Power tools need protection and a charging plan. Keep each tool with its battery, charger, and basic accessories when possible. If you use several cordless tools from the same system, dedicate one shelf or cabinet section to chargers and batteries. Do not bury chargers behind stored boxes where cords can become tangled or damaged.
Long-handled items such as rakes, shovels, brooms, and extension poles need vertical storage. Wall hooks, clips, or a freestanding organizer keep handles from sliding into a pile. Leave a little space between items so a shovel can be removed without pulling down the rest of the row.
For mobile projects, a portable toolbox or rolling cart may be more useful than permanent wall storage. This is a good fit for landlords, maintenance crews, and small businesses that bring tools to different units, work areas, or job sites. The trade-off is that portable storage can become a catch-all, so empty it and return items to their assigned spots after larger jobs.
Build a Workbench That Stays Usable
A workbench is valuable only when its surface is clear enough to work on. Limit the benchtop to the project in progress and a few permanent essentials, such as a task light or mounted vise if needed. Store everything else on the wall, in drawers, or below the bench.
Use drawers or labeled bins under the workbench for supplies that support repairs: sandpaper, tape, glues, spare blades, work gloves, and common fasteners. Keep sharp items in closed containers rather than loose in a drawer. If multiple people use the space, labels should be plain and specific, such as "Electrical Tape," "Drywall Anchors," or "1-inch Wood Screws."
A folding table can add temporary workspace without permanently taking up floor space. It is useful for assembling furniture, sorting hardware, packing orders, or handling a weekend repair project. When the job is done, fold it away and restore the open area.
Use Labels and Inventory to Prevent Tool Drift
Organization fails when items return to random locations after use. Labels make the correct home obvious, especially for bins, shelves, drawers, and shared work areas. You do not need a complicated inventory system for a home garage. A label maker, marker, and consistent container style can go a long way.
For a small business, property manager, or contractor, a basic list of higher-value tools is worth keeping. Record the tool name, model details if relevant, storage location, and any accessories that belong with it. This makes restocking and job preparation easier, and it reduces the chance that a missing charger or specialty attachment goes unnoticed.
Review the garage after the first few projects. If a tool keeps ending up on the workbench, the original storage spot is probably too far away or inconvenient. Move it closer to where it is used instead of expecting everyone to follow a layout that does not match real routines.
Make Floor Space Part of the Plan
A well-organized garage should still allow movement. Keep walkways clear from the entry door to the work area, vehicle, and major storage sections. Do not place extension cords, tool cases, or loose boxes where they create a trip hazard.
If the garage also stores inventory, shipping supplies, or maintenance materials, use shelving to grow upward rather than spreading outward. Put frequently packed items near the work surface and keep heavier cartons on lower levels. Easy Deal USA offers practical storage, carts, ladders, and material-handling options that can help match a setup to the size and demands of your space.
The best garage organization system is one you can reset in a few minutes after a project. Leave a little empty shelf space, keep one bin available for incoming supplies, and make returning tools part of the cleanup. That small habit keeps the garage ready for the next repair instead of turning every job into another search.
Recent Posts
-
How to Organize Toys With Clear Storage Bins
Toy clutter tends to peak right before the holidays, when birthday gifts from the year are still sca …Oct 23, 2026 -
Folding Chairs for Church Halls and Community Centers
Church halls, fellowship rooms and community centers ask more of their seating than almost any home. …Oct 23, 2026 -
Restaurant Bus Cart Guide: Using a Utility Cart for Bussing
Every busy dining room hits the same wall at some point in a shift: dirty plates stack up, servers m …Oct 23, 2026